
How To Propagate Orchids: Orchid Propagation
Playing orchids is a satisfaction for an amateur gardener.
If you thought that getting your orchids to flourish every year is the most you can aspire to cultivating orchids, you have not yet tried to multiply them: when you see how the smallest specimens grow, it is quite a rush.
Do you dare to reproduce orchids? Yes ?, Well, I’m going to tell you the different methods that exist to reproduce orchids, depending on the variety.
- 1 Sexual and asexual reproduction of orchids
- 2 Keikis: cuttings of floral rods or rooted cuttings
- 2.1 Damage identification
- 2.2 Stimulate the appearance of keikis
- 2.3 Transplant a keiki
- 3 Floral stem cuttings, head cuttings
- 3.1 Reproduce orchids by flower buds step by step
- 4 Reproduce orchids by division of pseudobulbs
- 5 Do you cheer up?
Sexual and asexual reproduction of orchids
Far from the stereotype that its cultivation and / or reproduction is very complicated, orchids in their natural habitat are a champion of survival. They have managed to develop together with sexual reproduction the asexual type. That is, they have the ability to reproduce through the classical system of most plants, that is, by fertilizing the flower through the pollen transported by insects, but it can also generate by itself, without any external fertilization, a small plant that develops in an old floral rod (already devoid of flowers). This small plant will be developed fixed to the mother plant but generating its own roots. It is a clone (usually called with the Japanese word “keiki”) of the mother plant so it will have all its characteristics.
The keikis. They tend to develop when the plant detects adverse light, temperature or other conditions and reacts to its possible death with the generation of the daughter plant. This mechanism allows you to have a chance of survival.
A third form of reproduction is from new shoots of the plant that usually occur at the base of the plant and then can be separated, especially in those cases in which the growth of the plant is from rhizomes or pseudobulbs.
Orchids, like almost all plants in nature, can be reproduced by cuttings from a mother plant, which would be asexual reproduction or by seeds, which would be sexual reproduction.
Like most plants, orchids reproduce sexually and asexually; the sexual one is carried out with a genetic exchange andthe offspring obtain genes from both plants, which guarantees greater diversity in the characteristics of the offspring; and the asexual form is obtained from fractions of the mother plant. Here are the different ways of asexually reproducing an orchid:
So as we said, orchids are able to reproduce in two different ways. The sexual route, with the seed and the other way of asexual form by the vegetative propagation. For the beginner, the vegetative propagation is the easiest to use to multiply the number of orchids.
Here we are going to expose the 3 simplest methods to get it.
- 1 Reproduction of orchids by Keikis or floral stick:
- 2 Reproduction of orchids by cuttings:
- 3 Reproduction of orchids using bulbs:
Sexual reproduction is common in nature: one plant is pollinated by another, thanks to the insects transfer pollen from the flowers, the pollination that gives rise to the seeds takes place, which later will become new orchid specimens.
This way of multiplying orchids is very complicated for amateur gardeners, besides being impossible to control the final result.
When different specimens are pollinated, the resulting plant will have part of the characteristics of the two, but in principle we do not know what the new orchid will look like.
With the asexual reproduction, by means of cuttings of floral varas or division of pseudobulbs, we obtain plants with identical characteristics to the mother plant.
Some advantages of asexual reproduction are:
Obtain quality plants in greater quantity and in less time.Reproduce them at any time of the year, which allows greater efficiency in the crop cycle and may favor that the flowering occurs more than once a year.
Keikis: cuttings of floral rods or rooted cuttings
Sometimes and spontaneously, some varieties of orchids produce keikis, which are little ones that appear in their flower sticks.What are the keikis?
Keikis is a Hawaiian word that means baby. The keikis are floral layers , although everyone uses the word keikis, to designate this phenomenon of nature.

In the floral stick, a small plant grows and this is a good opportunity to replicate it.The new plant is an exact replica of the mother since it is produced by asexual reproduction (without pollinators). This phenomenon is called “Keiki”. This occurs naturally but it is also possible to help the plant to generate them. This is what we are going to explain next.
It must also be said that this varies according to the species of orchid, in the orchids Dendrobium and Epidendrum it is very common. This is the easiest way to reproduce Phalaenopsis orchids.
The varieties most prone to generate keikis are the orchids Dendrobium and the Epidendrum, although in some occasions the orchids Phalaenopsis can surprise us with the appearance of a keiki.
Orchids can generate keikis for many reasons. The worst reason is that the orchid is subjected to a lot of stress, and the appearance of a keiki is a way to try to reproduce before dying.
Keiki identification
We will know quickly that we are in front of a keiki, when we observe that from a knot of the floral stick, some aerial roots begin to appear. Then begin to be born some leaves identical to those of the mother plant.
Do not be in a hurry to cut the keiki, let it grow a little, its roots are about 5 or 6 centimeters long and at least have three well-developed leaves.

How to get an orchid Keiki:
Here we can put into practice the following trick. When the orchid has finished blooming and we are going to cut the floral stick, we cut the stick just above a knot that it has. Then we peel a little the area of the knot, very carefully. This way it will remain on the air and it is very possible that roots and a Keiki come out. There are also products that we can apply right in that knot.
The plant hormones that carry some special products for this purpose can be applied to a node in the stem or flowering base to stimulate the growth of a Keiki.
Stimulate the appearance of keikis
After the orchid has bloomed, if we want to cause it to produce keikis, we must cut the floral wand over a knot, about half the length of the floral wand.
Then carefully remove the skin that covers the yolks of the knots , to get more exposure to light.
Another trick to stimulate the appearance of keikis, is to apply plant growth hormones on the knots.

Transplant a keiki
Once we have cut the keiki, we can place it in a proper pot or let it grow in the pot of the original plant.
Some gardeners recommend this last option. That the keiki grow during its first year in the shelter of the mother plant, since the original plant can regulate the soil conditions so that the new orchid fruit of the keiki, is adapted little by little.
We have to be careful that the plant does not receive too much direct light, and we will gradually increase the amount of light it receives.
The logical thing is that we get our first flowering after two to three years , although in rare cases it is achieved in the first year of life.
How to plant a Keiki:
When a Keiki has roots of about 4 or 6 cm, it is time to replant both the mother and the “baby”.
It is recommended (not necessary) to plant both together in the same pot. When the Keikis are very small it is better to plant it next to the mother plant in the same pot so that it has the same conditions of growth and humidity.
We cut the Keiki around 3 or 5 centimeters on the floral stem or stem and gently place the small plant next to the mother. Put the roots down and cover slightly with the substrate. The piece of rod that we cut previously must also be buried. It can be folded and placed on the ground as an anchor.
Once the Keiki has grasped and is growing properly, the Keiki can be separated from the mother plant. This has to be done with care. Above all, we must wait until it is bigger and stronger to be able to transplant it.
Floral stem cuttings, head cuttings
If your orchid has not awarded you a keiki, do not despair, you are still in time to get new orchids from the flower varas.
As with other plants, such as roses or hydrangeas, it is possible to reproduce the orchids with cuttings, even if they do not have keikis.
This way of getting new orchids should be put into practice in fast-growing varieties , such as Phalaenopsis or Vanda orchids , but never with slow-growing ones, because we would need years until the cuttings became flowering plants.
To obtain viable cuttings, we will need:
- Sharp scissors that are disinfected
- A very sharp knife or scalpel, also disinfected
- Coconut fiber or a similar substrate for orchids. It could serve sphagnum, but it’s harder to find
- Rooting hormones
- A shallow plastic container
- Transparent film
- Obviously, an orchid with a floral rod that has lost all its flowers

Reproduce orchids by flower buds step by step
- Cut a stem in your orchid at least 30 centimeters long near the base using the pruning shears or a sharp knife. Divide the stem into several sections of about 7 cm, making sure that each cutting has a dormant bud.
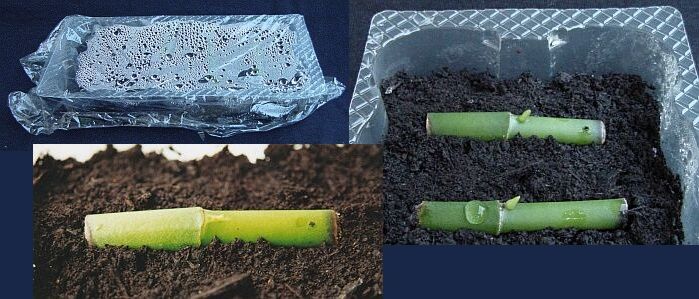
- Use a shallow tray to place sphagnum moss, and spray the moss until it is completely moist. Place the cuttings in the tray. Cover the tray with a polyurethane plastic wrap and place it in a place that is at least 15 degrees centigrade and out of direct sunlight.
- After a few weeks the temperature of the tray rises with the cuttings to about 24 or 30 degrees. You have to spray the cuttings regularly toCuttings that have already been born, with their small roots.keep them moist. Nor with too much water because they can rot. Once every two weeks for the first two months you can spray the water with a soluble nitrogen fertilizer. Continue using the foliar fertilizer every two weeks until the cuttings develop leaves and roots. Throw away any cutting that is rotting.
- After the cuts have developed new shoots and roots, gently cut the stem between the seedling using clean pruning shears.
- You have to find a small pot. You can put the new plants in a mixture of bark, volcanic rock and sphagnum moss.
- Before placing the plants, soak the substrate well. Plant the orchid with the old stem straight and the buds to the side or up. Place the plant carefully on the substrate and add a stick if necessary to keep it upright. The new leaves will grow and the roots will roll between the substrate.
- You have to place the new orchids taken by cuttings in a bright place, but without direct sun. It can be a window facing south or west, covered by thin curtains. The temperature should be mild, depending on the species of orchid. The ideal is to have them at the same temperature as the mother plant.
- Water already in a normal way, when you notice the substrate almost dry putting the pot in the sink and adding the water until the pot drains. Small orchids like ours may need watering twice a week, while large plants only need watering once a week. Reduces watering in autumn and winter.
- Keep a high humidity around the orchid. Avoid placing the plant near radiators or hot or cold air currents (air conditioning) To add moisture to the air you can spray gently with a boat or put a humidifier.
- During the active growing season (spring and summer), use a foliar fertilizer monthly. As an alternative, you can apply a water soluble fertilizer diluted with a quarter of a force 12-12-12 with every second irrigation.
Below there is another process. I prefer the one described above.
- We will fill the plastic tray with the substrate for orchids , and moisten it
- We cut the orchid’s floral wand near the base, using good, well-cleaned pruning shears
- We divide the floral rod into as many pieces as there are knots. The cuttings can have 3 or 4 centimeters.
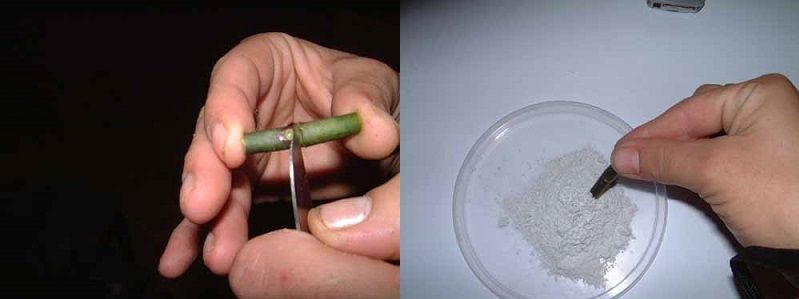
- With the scalpel we remove, taking great care, the skin that covers the knot
- We put them in distilled water or rainwater for one hour, so they hydrate well
- We wet the tips in the rooting hormone
- We place the cuttings on the substrate, with the knots facing upwards. You do not have to bury
- We cover the container with the transparent film
- We will water little, using a sprayer
- We will transplant to a pot when the cutting has roots and leaves
- If everything works correctly, we can have orchids in bloom in two years
Reproduce orchids by division of pseudobulbs
Certain species of orchids have an organ responsible for storing water and nutrients, the pseudobulbs, which are produced from a creeping stem called a rhizome.
By dividing a plant by the pseudobulbs through a cut, it is possible to generate two or more plants.With careful separation of the roots, following the appropriate technique, several plants can be created from one.
With the technique called hormonal pulse, which basically consists of promoting through the buds, the growth of new plants or buds.Through tissue culture that is only mentioned here, because its realization is very specialized and requires very particular working conditions.
As orchids grow and develop, they generate more pseudobulbs.

When the time comes to transplant the orchid, because it has acquired a considerable size and does not fit in its current pot, we can take advantage of the occasion to separate part of the pseudobulbs, generating a new orchid.
The process is simple:
- For the division to succeed, each new orchid must have at least three pseudobulbs. We proceed like this to increase the chances of success, since these organs are in charge of storing nutrients.
- It is advisable to perform this operation at the beginning of spring, or just after the orchid has finished its flowering. It is when the pseudobulbs contain more nutrients, increasing the chances of success.
- We will use a sharp knife, which we will have previously disinfected.
- We will proceed to separate the roots carefully, cutting between the union of pseudobulbs without damaging them.
- We will heal the cut with sulfur powder, a very effective fungicide, which will prevent fungal attack.
- We eliminate broken roots, damaged or dead, to prevent the appearance of diseases .
- We will place the new orchids in a pot not very large , which ensures growth for a year, with a suitable substrate for orchids.
When a mature orchid plant has grown and flourished for several years, the novice grower finds that the plant is too large for the pot. Then we have 2 options:

You can transplant the orchid to another basket or larger pot, as we explained in this article: How to transplant an orchid .
You can also divide it into two or more separate plants, to which we are going, reproduce orchids. If the plant has only one head you can divide it by cutting the plant into groups of three or four bulbs. It is important the amount of 3 or 4 bulbs, if you take only 1 it is very possible that it does not grip or grow. There will be bulbs that look dead, do not throw them away because they will probably grow too.
Now we have to cut the roots. Cut the oldest, rotten or those with mushrooms. You have to clean the roots well. Then a solution of water, alcohol and if you have a little cinnamon powder is applied to the wound. Be careful not to cut roots that have “live” areas.
The next step is to plant the bulbs. Fill a pot of your favorite substrate. You can put chip, pine bark, etc. Prevents the substrate from keeping too much moisture. Insert the bulbs and place them vertically.
We will have to water from time to time but only spraying with a can of water. Forget about watering with the shower until it soaks everything In about 2 or 3 weeks we will have new roots and buds. Now we have to wait a few weeks and we can separate the children of orchids. This step is simple, we do as if we were to transplant, and you should untie the roots in case of being tied and that you notice you cannot handle them properly.
With these 3 methods we can reproduce our orchids and get more copies to see the beautiful blooms that they offer us.
Methods Of Propagation By Meristems
Different methods of propagation by meristems have been developed depending on the type of explant, growing vegetative shoots, which should be sterilized in calcium hypochlorite or 4% sodium for 20-30 minutes. Then they are rinsed in sterile distilled water and the isolation and sowing of the meristems or buds is carried out.
Another type of propagation is the vegetative one, which is carried out using the buds of the floral bud shoots, this technique has been applied successfully in Cymbidium Sw. And Phalaenopsis Blume. It consists of the cutting of knots that contain dormant buds, their sterilization, rinsing and sowing in culture media with hormones that induce the formation of new seedlings from these buds.
Young foliar apices of seedlings cultured in vitro have also been used to obtain protocorms in Cattleya with success only in the case of using very young leaves as explants . The propagation works of species such as Cattleya and Phalaenopsis, opening the possibility of propagating important horticultural species without affecting the vegetative organs of the same.
And the foliar division or replication, which consists of dividing very widespread plants into, minimum, 4 bulbs that will form another independent plant. Always respecting the incipient buds that are at the base of each leaf bulb for the proper development of the future new plant. This method is very safe to apply.

I am Don Burke, one of the authors at My Garden Guide. I am a horticulturist that cultivates, grows, and cares for plants, ranging from shrubs and fruits to flowers. I do it in my own garden and in my nursery. I show you how to take care of your garden and how to perform garden landscaping in an easy way, step by step.I am originally from Sydney and I wrote in local magazines. Later on, I have decided, more than two decades ago, to create my own blog. My area of specialization is related to orchid care, succulent care, and the study of the substrate and the soil. Therefore, you will see many articles dedicated to these disciplines. I also provide advice about how to improve the landscape design of your garden.